How can you Paint a Concrete Basement Wall? What You Need to Know:

How can you Paint a Concrete Basement Wall? What You Need to Know:

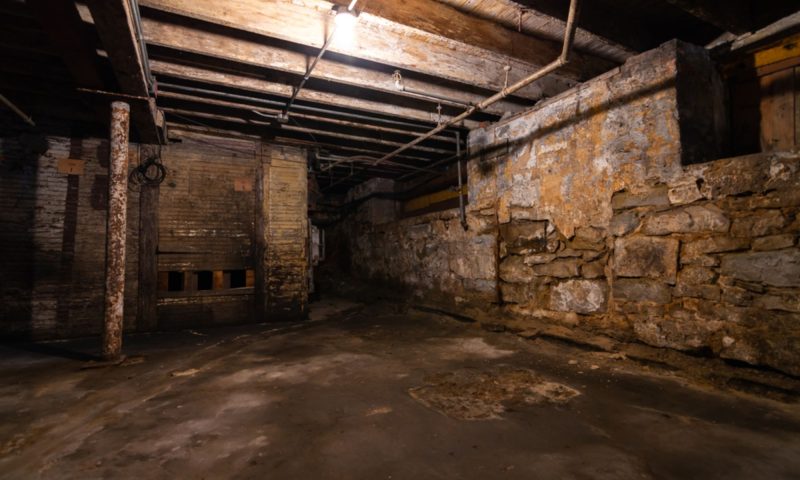
Most people think of basements as cold, dark, and damp places. But with a little bit of paint, you can transform your basement into a warm and inviting space. Whether you want to create a cozy den or a home theater, painting the concrete walls is a great way to get started.

Not only will it brighten up the space, but it will also help to conceal any imperfections. Plus, painting is a relatively inexpensive way to make a big impact. So if you’re looking for a quick and easy way to transform your basement, grab a paintbrush and get started.

10 Ideas For Painting A Concrete Basement Wall:

Painting a concrete basement wall may seem like a daunting task, but with the right preparation and technique, it can be easily accomplished. Here are 10 ideas to get you started:

1. Go for a solid color

A fresh coat of paint can illuminate any space, but when it comes to painting a concrete basement wall

A fresh coat of paint can illuminate any space, but when it comes to painting a concrete basement wall, there are a few things to keep in mind. First of all, it’s important to choose the right color for paint.

A solid color is always a good choice for a concrete basement wall because it will provide good coverage and give the space a clean, finished look.  Choose a light color if you want the space to feel bright and open, or opt for a darker shade if you’re going for a cozier feel.

Additionally, be sure to prime the surface before painting to ensure that the paint will adhere properly. With a little time and effort, you can transform your concrete basement wall into a stylish and welcoming space.

2. Use a stencil

If you're looking for a way to add some personality to your home without breaking the bank, stenciling is a great option.

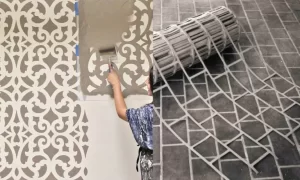
If you’re looking for a way to add some personality to your home without breaking the bank, stenciling is a great option. Whether you want to create a focal point in your concrete basement walls or add some pattern to your kitchen backsplash, stenciling is a fun and easy way to get creative with your decor.

Plus, it’s relatively inexpensive and requires very little setup or cleanup. So what are you waiting for? Grab a stencil and some paint, and let’s get started!

3. Go for a faux finish

If you're searching to your basement without sacrificing quality, choose a faux finish

If you’re searching for a cheap and cheerful way to add personality to your basement without sacrificing quality, choose a faux finish! Whether you want the look of stone, brick, or wood, there’s a faux finish that can give your basement wall the appearance you desire.

Not only is painting a concrete basement wall a budget-friendly option, but it’s also surprisingly easy to do. With just a little time and effort, you can transform your space into something truly unique. So what are you waiting for? Spruce up your basement with a faux finish and give it some personality to your basement wall! 

4. Paint a mural

Why not paint a mural on one of your basement walls? murals can add interest and drama to any wall

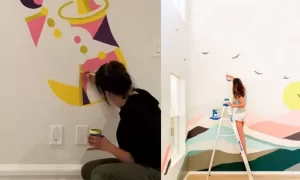
Are you looking for a fun and classic approach to personalize your house? Why not paint a mural on one of your basement walls? murals can add interest and drama to any wall, and they’re a great way to show off your creativity. Plus, painting a mural is a relatively easy DIY project that anyone can do.

If you’re thinking about painting a mural, one of the best surfaces to work with is concrete. Concrete basement walls provide a large and smooth canvas that’s perfect for painting. Plus, concrete is durable and easy to clean, so your mural will stay looking great for years to come.

So what are you waiting for? Gather your supplies and get started on your very own concrete mural today!

5. Use chalkboard paint

Chalkboard paint is a fun and easy way to add function and style to any space

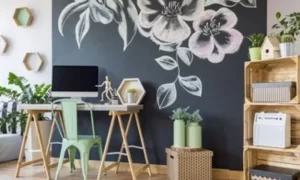
Chalkboard paint is a fun and easy way to add function and style to any space. Whether you want to create a command center in your basement wall or make a playroom more fun for your kids, chalkboard paint is a great option. Plus, it’s perfect for painting a concrete basement wall because it provides good coverage and adheres well to the surface.

One thing to keep in mind when using chalkboard paint is that it can be difficult to remove if you decide you want to change things up later on. However, with a little elbow grease and some patience, you should be able to get the job done.

So go ahead and give it a try! You may be surprised at how much you enjoy painting with chalkboard paint.

6. Add some stripes

If you're looking for a quick and easy way to add some interest to your basement wall, try painting stripes!

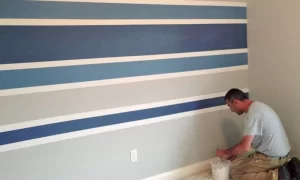
If you’re looking for a quick and easy way to add some interest to your basement wall, try painting stripes! This is a great project for beginners because it doesn’t require any complex techniques or materials. Plus, it’s a budget-friendly way to spruce up your concrete basement wall.

To paint stripes on your concrete basement wall, start by using painter’s tape to create a straight line. Then, paint over the tape with your desired color. Once the paint is dry, remove the tape and enjoy your new stripes!

7. Paint a geometric design

If you want to add a little bit of pizzazz to your space, try painting a geometric design.

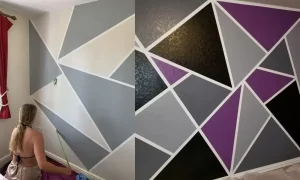
If you want to add a little bit of pizzazz to your space, try painting a geometric design on your concrete basement wall. This is a great project for those who are feeling a little bit more adventurous, as it requires some basic art skills. But don’t worry – if you make a mistake, you can always repaint it.

To get started, use painter’s tape to create your desired design on the wall. Then, start painting your design with your desired colors. Once you’re finished, remove the tape and enjoy your new geometric wall!

8. Paint an accent wall

If you're looking for a way to add some drama to your concrete basement wall painting an accent wall

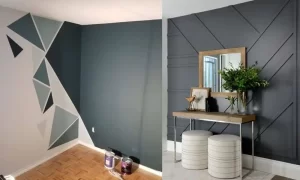
If you’re looking for a way to add some drama to your concrete basement wall, consider painting an accent wall. This is a great way to make a bold statement without having to paint the entire basement. Plus, it can be completed in just a few hours.

To paint an accent wall, start by choosing the wall that you want to feature. Then, paint it with your desired color. Once the paint is dry, add some accent pieces to really make your wall pop. For example, you could hang a piece of art or add some shelving. Whatever you choose, make sure it reflects your personal style!

9. Use glow-in-the-dark paint

Glow-in-the-dark paint is a fun way to add some nighttime interest to your concrete basement wall

Glow-in-the-dark paint is a fun way to add some nighttime interest to your concrete basement wall. This type of paint is perfect for those who want to create a unique and playful space. Plus, it’s a great way to add some safety to your basement in case of a power outage.

To use glow-in-the-dark paint, start by painting your wall with a white base coat. Then, apply the glow-in-the-dark paint over top. Once the paint is dry, turn off the lights and enjoy your new illuminated space!

10. Use reflective paint

 the concrete walls in your basement could be a source of reflected light and heat

You may not have realized it, but the concrete walls in your basement could be a source of reflected light and heat. By painting them with reflective paint, you can help to keep your basement cooler in the summer and warmer in the winter.

Reflective paint also has the added benefit of reducing glare, making it easier to see in your basement. If you’re looking for a way to improve the comfort of your home and save on energy costs, reflective paint is a great option.

So next time you’re at the hardware store, pick up a can of reflective paint and give it a try. You’ll be glad you did!

Get creative!

There are no rules when it comes to painting your concrete basement wall. So go ahead and get creative! There are endless possibilities when it comes to design, so let your imagination run wild.

Whatever you choose, make sure it reflects your personal style and taste. After all, this is your space and you should enjoy looking at it every day. So have fun and don’t be afraid to experiment!

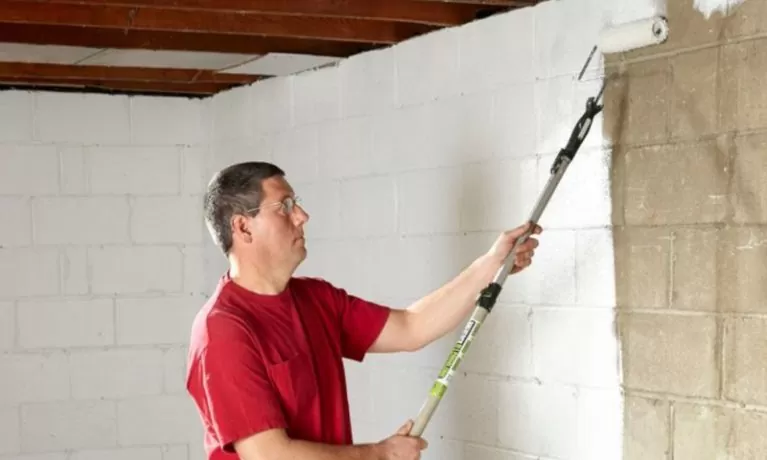
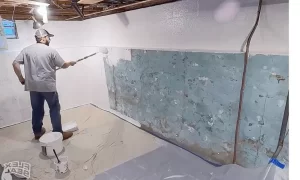
How to Prepare Concrete Basement Walls for Painting?

Whether you’re trying to increase the value of your home before selling or you’re just ready for a change, giving your basement walls a fresh coat of paint is a great way to transform the space.

But before you break out the roller and paint tray, there are a few prep steps you need to take to ensure that your project goes smoothly.

Here’s a quick guide on how to prepare concrete basement walls for painting.

  • Start by giving the walls a thorough cleaning. You can do this with a mixture of water and mild detergent.
  • Once the walls are clean, allow them to dry completely.
  • Use a concrete patching compound to fill in any cracks or holes.
  • Once the patching compound is dry, sand the entire surface to create an even surface.
  • Finally, apply a primer before painting.

By taking these prep steps, you’ll be one step closer to transforming your basement into the space of your concrete basement walls.

Should You Use a Primer Before Painting a Concrete Basement Wall?

You’re staring at your blank basement walls, wondering what color to paint them. You’ve narrowed it down to a few options, but you can’t seem to make a decision. Suddenly, you remember hearing that you should use a primer before painting a concrete basement wall.

But is that really necessary? 

To answer that question, it’s important to understand what primer is and what it does. Primer is a type of paint that helps to improve the appearance of the paint job and increase the durability of the paint. It can also help to protect the concrete from weathering and staining. In short, primer provides a barrier between the concrete and the paint, which can help to prolong the life of your paint job. 

So should you use a primer before painting a concrete basement wall? The answer is yes! So if you’re looking for a long-lasting paint job, be sure to use primer!

Conclusion:

Painting a concrete basement wall may seem daunting, but with the right preparation and materials, it can be a relatively easy task. Our blog is packed with information on how to paint all concrete basement walls, so be sure to visit us regularly for more tips and tricks. In the meantime, here are 10 ideas for painting a concrete basement wall that will help you get started.

How To Fix A Leaky Basement: 10 Proven Tips

How Do You Seal Or Fix A Leaking Basement

Have you ever walked into your basement only to be greeted by a pool of water? If so, you’re probably all too familiar with the frustration and headache a leaking basement can cause. Not only is it a nuisance, but it can also lead to serious damage to your home if left unchecked.

The good news is that there are steps you can take to seal or fix your leaking basement. By taking the time to identify the source of the leak and making the necessary repairs, you can help keep your basement dry and prevent further damage to your home.

So don’t wait any longer. Get started fixing that leaky basement today.

10 Must-know Tips for Fixing a Leaking Basement:

A leaky basement can be a big problem for any homeowner. Not only can it cause damage to your belongings, but it can also lead to mold and mildew growth.

Left unchecked, a leaking basement can even jeopardize the structural integrity of your home. Fortunately, there are a few simple steps that you can take to fix a leaking basement.

Here are 10 must-know tips:

1. Start by identifying the source of the leakage

Start by identifying the source of the leakage

The first step to take when trying to fix a leaking basement is to identify the source of the leak. This can sometimes be a tricky task, as water can enter your basement in a number of ways.

However, there are a few telltale signs that can help you zero in on the source of the leak. For example, if you notice water stains on your walls or floor, chances are good that the leak comes from a crack in your foundation.

Or, if you see water seeping through the joint where your floor and wall meet, the problem is likely with your gutters or downspouts.

2. Check for any other possible drinking water sources

Check for any other possible drinking water sources

In addition to checking for cracks in your foundation and clogged gutters and downspouts, be sure to check for any other potential water sources. This includes leaks in your plumbing, cracks in your walls, and gaps around doors and windows. Any of these can be potential sources of a leaky basement.

3. After identifying the source of the leak, it’s time to take action

After identifying the source of the leak, it's time to take action

If the leak is coming from a crack in your foundation, the best way to fix it is by using hydraulic cement. This type of cement is designed to expand as it dries, so it can fill any cracks or voids in your foundation and stop water from seeping through it.

If the leakage is coming from your gutters or downspouts, the problem is likely that they are clogged or blocked. Start by cleaning out any debris that has accumulated in your gutters. Then, check your downspouts to make sure they are clear and free of obstructions.

4. You may need to waterproof your basement from the inside in certain situations

If you’ve tried all of the above tips, such as applying hydraulic cement and your basement is still leaking, it may be time to waterproof it from the inside. Most people think of waterproofing their basement from the outside, but did you know that in some situations, it may make more sense to waterproof your basement from the inside?

By sealing the cracks and gaps from the inside, various products, such as sealants, tarps, or plastic sheets. You can create a barrier against water leakage. Not only is this method more effective, but it also prevents any future damage to your home’s foundation.

So if you’re looking for a way to keep your basement dry, don’t forget to consider waterproofing from the inside. Waterproofing your basement will help to keep it dry and prevent further water damage.

5. Use a sump pump to remove water from the basement

Use a sump pump to remove water from the basement

You return home from work, open the door to your basement, and are immediately greeted by a dank smell and waterlogged carpet. Your basement is flooded, and you have no idea what to do.

Before you start panicking, take a deep breath and remember that you have a sump pump. Sump pumps are designed to remove water from basements, and they can be a lifesaver in situations like this.

How to use the sump pump?

Connect the pump to a water source and switch it on, and the pump will start removing water from your basement. In no time, your basement will be dry and look as good as new.

So don’t wait until your basement is already flooded to buy a sump pump – make sure you have one on hand in case of emergencies. It could end up being the best purchase you ever make.

6. For the best outcome. install a water drainage system in the basement

For the best outcome. install a water drainage system in the basement

Basements are notorious for being damp and musty. This is because they are located underground and typically do not have proper ventilation or drainage. As a result, basements are often susceptible to flooding.

Installing a drainage system in the basement is the best way to protect your home from water damage. A water drainage system will stop your basement from flooding by collecting and removing the water.

In addition, a water drainage system will also help to improve the air quality in the basement by removing excess moisture. Basements with proper drainage systems are less likely to develop mold and mildew, making them more comfortable and healthy places to live. 

So, for the best outcome, install a water drainage system in the basement to remove water from the basement.

7. Know when to call in a professional

If you’ve tried all of the above tips and your basement is still leaking, it may be time to call in a professional. A professional can help to identify the source of the leak and take steps to fix it.

8. Prepare your basement for heavy rains or storms

Prepare your basement for heavy rains or storms

If you live in an area that is prone to heavy rains or storms, it’s important to be prepared for the possibility of a flood. To do this, you should have a plan in place for how to deal with any water that does enter your basement.

This may include using sandbags or other barriers to help keep water out or having a pump on hand to remove any water entering the basement. By being prepared, you can help to minimize the damage caused by a flood and make cleanup much easier.

9. Take steps to prevent future leaks

No one likes dealing with a leaky basement. Not only is it a pain to clean up, but it can also cause long-term damage to your home. Fortunately, there are a few preventive steps you can take to minimize the risk of future leaks.

Preventive tips:

Once you’ve fixed the leak, it’s important to take measures to prevent it from happening again in the future.

For example, if your gutters and downspouts were the cause of the leak, be sure to clean them out on a regular basis (at least once a month) to prevent debris from building up and causing problems in the future.

It’s also a good idea to check your foundation for cracks on a regular basis and repair any that you find as soon as possible.

By taking these preventive measures, you can help keep your basement dry and avoid the headache of another leak in the future.

10. Be prepared for the cost of repairs

No one likes to think about the possibility of their basement flooding, but it’s a reality that many homeowners face. Depending on the extent of the damage, fixing a leaky basement can be a costly endeavor. Be sure to set aside enough money to cover the cost of any repairs that need to be made.

How Much Does It Cost to Seal a Leaking Basement?

Are you sick of feeling like your home is slowly swamped by water every time it rains? Well, you’re not alone. A leaking basement is a common problem that many homeowners face. But what many people don’t realize is that sealing a leaking basement can be a costly affair.

The average cost of sealing a leaking basement ranges from $500 to $4,000. But the cost can go even higher if the damage is extensive. If you’re thinking of sealing your leaking basement, then you need to be prepared to spend a pretty penny. But the good news is that it will be worth it in the long run.

A sealed basement will not only improve the value of your home but also protect your belongings from water damage. So, if you’re ready to invest in your home, sealing your leaking basement is a great place to start.

Final Thoughts:

Fixing a leaking basement can seem daunting, but with the right tips and some know-how, it can be a relatively easy fix. We’ve gathered some of the best tips from experts in the field to help you start your repair project. Be sure to visit our blog regularly for more helpful advice and information on fixing your home.

How to Paint a Cement Wall in Your Basement? 7 Tips for Success

How to Paint a Cement Wall in Your Basement

You know that saying, “A change is as good as a rest?” Well, when it comes to your basement, it’s time to take that advice and run with it – by painting your cement walls! A fresh coat of paint can transform any space, and your basement is no exception.

Not only will it make the space feel cleaner and brighter, but it can also help to hide any imperfections in the concrete. And if you’re feeling really ambitious, you could even add a mural or some other form of artwork to really make the space your own.

So what are you waiting for? Get out those brushes and start painting!

Do you Need Special Paint for the Cement Wall?

Cement walls are often seen as utilitarian and plain, but with the right paint, they can be transformed into beautiful works of art.

But what kind of paint should you use on cement? The short answer is that you don’t need special paint for cement walls; any high-quality latex paint will do.

However, there are a few things to keep in mind when painting cement walls.

First, because cement is a porous material, it will absorb more paint than drywall or wood. As a result, you’ll need to apply at least two coats of paint to get even coverage.

Second, because cement is highly alkaline, it can react with some paints, causing them to yellow or fade over time. To avoid this problem, make sure to use a primer specifically designed for use on cement.

With the right preparation, your cement walls will look amazing for years to come.

Tips for Painting a Cement Wall in Your Basement:7 secret tips

Who said painting cement walls was going to be easy? If you’re looking for a challenge, then painting your basement’s cement walls is the perfect project for you. But don’t worry, we’re here to help. With our few secret tips, you’ll be an expert in no time.

So what are you waiting for? Time to move on.

Before painting: Inspect the basement wall for water damage

Before painting Inspect the basement wall for water damage

You’re about to embark on a painting project in your home. But before you start, there’s one critical task you need to take care of first: inspecting the basement cement walls for water damage.

Water damage can cause all sorts of problems with your paint job, from bubbling and peeling to mold and mildew growth. And once these problems start, they can be very difficult to fix. That’s why it’s so important to check for water damage before you begin painting.

Fortunately, Inspecting the basement cement wall for water damage before painting is a relatively easy task. Just look for any cracks or holes in the walls and ceiling, and check to see if there is any staining or discoloration. If you see any of these signs, then there’s a good chance that you have water damage.

So don’t wait until it’s too late. Before you start your painting project, take the time to inspect the basement cement wall for water damage. It could save you a lot of time, money, and headaches in the long run.

1. The right tools for painting a cement wall in your basement

  • wire brush
  • scraper
  • putty knife
  • sandpaper
  • drop cloths
  • cement
  • small sled and cold chisel

2. Remove the debris from the wall

Remove the debris from the wall

If you’re planning on painting your cement wall, the first step is to remove any debris that may be clinging to the surface. Not only will this ensure that your paint job looks its best, but it will also help to prolong the life of the paint.

There are a few different ways that you can go about removing debris from your cement wall, and the method that you choose will depend on the type and amount of debris that you’re dealing with.

If you’re working with a small amount of light debris, a simple power washer should do the trick. For heavier debris, you may need to use a putty knife or wire brush to loosen and remove it. No matter what method you use, taking the time to remove debris before painting will give you better results in the end.

3. Use the proper tools to fix cracks

Before painting you have always noticed cracks in your basement walls and wondered how to fix them. It’s actually easier than you might think – all you need is the proper tools. First, you’ll need a small sled and cold chisel. With these two items, you can easily repair cracks in your basement walls.

Here’s how: first, use the sled to lightly tap the chisel into the crack. Next, use the chisel to slowly widen the crack. Finally, use the sled to break off any loose pieces of cement.

With just a little bit of effort, you can easily fix cracks in your basement walls – and prevent further damage to your home.

4. Apply cement to fill the crack

Apply cement to fill the crack

Cracks in your basement walls can not only be unsightly, but they can also lead to serious structural problems after painting. By applying hydraulic cement to fill the cracks before painting, you can help to prevent further damage and improve the appearance of your basement.

Hydraulic cement hardens quickly and bonds well with the surrounding concrete, making it an ideal material for filling cracks. In addition, hydraulic cement is resistant to water and weathering, making it a good long-term solution for preventing further cracking.

Make sure you apply paint to the cement wall after applying hydraulic cement to the cracks.

5. Prime the wall

Prime the wall

Applying primer to a wall before painting is often seen as an unnecessary extra step, but anyone who has ever painted knows that it can make all the difference. Primer provides a smooth surface for paint to adhere to, and it can help to hide imperfections in the wall.

In addition, primer helps to protect the wall from the wear and tear of everyday life. A freshly painted wall always looks great, but without primer, it won’t take long before the paint starts to chip and fade.

So next time you’re getting ready to paint, make sure you take the time to prime the walls first – your future self will thank you for it!

6. Apply the paint

Now that you’ve prepared the wall and applied primer, it’s finally time to paint! When painting a cement wall, be sure to use a paint that is specifically designed for use on cement walls.

Apply first layer with brush:

Apply first layer with brush

When a painting job starts it is essential to apply the first coat with a brush this will help to create a good paint job and will last longer.

To apply the paint, use a brush that is specially designed for painting cement basement walls. Be sure to work in small sections so that the paint doesn’t have a chance to dry before you’re finished.

Once you’ve applied the first coat of paint, allow it to dry completely before applying a second coat.

Apply second layer with roller:

Apply second layer with roller

After the first layer of paint has dried, you can use a roller to apply a second coat. Rollers provide an even layer of paint and can help to cover any missed spots from the first coat and ensure that the wall is completely covered.

7. Let the paint dry

After you’ve applied the second coat of paint, it’s important to let it dry completely before using the basement. Depending on the temperature and humidity, this can take anywhere from a few hours to a few days.

What Color Should You Paint Your Cement Wall in the Basement?

You’ve just moved into a new house and are eager to start making it your own. But as you descend into the basement, you’re faced with an unappealing cement wall. painting this wall is a daunting task, but it’s a necessary one if you want to transform your basement into a welcoming space.

But what color should you paint your cement wall? While there are many options, there are a few factors to consider before making your decision.

First, think about the overall atmosphere you want to create in your basement. Do you want it to be cozy and inviting or bright and cheerful? Consider also the amount of natural light in your basement and whether you want to accentuate or offset this light.

Once you’ve considered these factors, you can narrow down your options and choose the perfect color for your cement wall. With a little bit of planning, painting your cement wall will be a breeze – and you’ll end up with beautiful results that make your basement feel like home.

Conclusion:

Painting a cement wall in your basement can be a daunting task. But with the right preparation and tools, it can be an easy project that you can complete in just a few hours. Be sure to follow our tips for painting a cement wall so that your finished product looks great and lasts for years. And don’t forget to visit our blog regularly for more helpful tips like this one!